In my first two blogs on canthoplasty surgery I discussed canthal anatomy https://drmassry.com/blog/?p=190 and why canthoplasty surgery is important https://drmassry.com/blog/?p=194
Please refer to these links for review.
Today I will describe with surgical photos and accompanying illustrations the traditional canthoplasty surgery or “lateral tarsal strip procedure.”
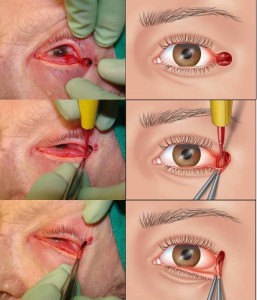
In the series below the top photos show the opening of the canthus (canhotomy), the middle photos the surgical cutting of the lid from the oribt bone (cantholysis), and the bottom photos how the lid is dynamically free after its release from bone. This is how canthoplasty surgery begins
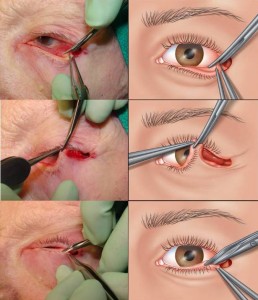
In the next series the photos demonstrate how a tarsal tongue (what we use to re-anchor lid to bone) is formed. Top: tarsus (skeleton of lower lid) is released, middle and bottom: surrounding skin is cut away from tarsus. This is how canthoplasty surgery progresses
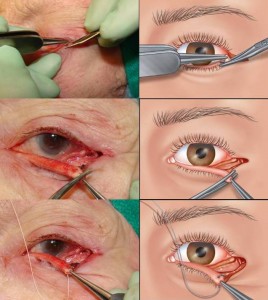
In the next series on canthoplasty surgery the tarsus is prepared for suturing to bone. Top: residual skin istrimmed from the tarsus, middle: tarsus is shortened, bottom: suture placed through tarsus in preparation for anchoring to bone. The canthoplasty surgery is almost complete
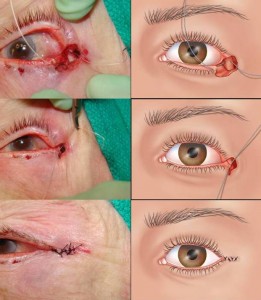
In the final series below the canthoplasty surgery is completed. Top: suture placed through lining of the bone (periosteum), middle: lid tightened, bottom: skin closed.
As you can se there are many critical steps in canthoplasty surgery. All the steps are important in order to get a good result. For examples of before and after pictures of patients having canthoplasty surgery open the following link from my website https://drmassry.com/#/1-1
If you are interested in information on canthoplasty surgery you can contact Dr. Guy Massry (Beverly Hills Ophthalmic Plastic Surgery) at his office (310) 453-8474 or through his website https://drmassry.com
